Recently, it’s suddenly getting hotter. I started a gaming app at home during Stay Home Week and I couldn’t stop. Nice to meet you, I’m an anime otaku and software engineer named “Hoge”.
Live2D is developing the technology to move pictures and offers software called “Cubism”.
It was also used in the recently released Twisted Wonderland, Disney’s hugely popular game app.
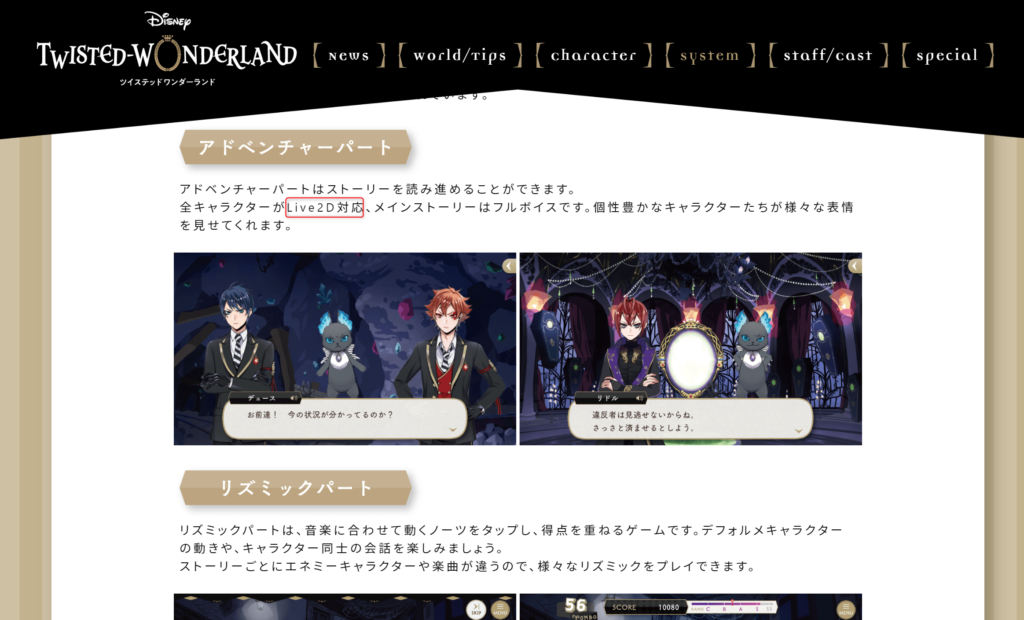
In this article, I’ll explain the three things to understand about Live2D: application examples, mechanisms, and production work.
Three things to understand about Live2D
1. check what you can do with Live2D and its application examples
Live2D representation is used in many different places.
If you use Live2D, you’ll find out how much more you can do.
game app
As I introduced at the beginning of this article, you can use it to create standing pictures, UI, and effects for games on iOS, Android, Unity, OpenGL, DirectX, HTML5, and home video game consoles.
There is an unlimited number of possible uses for it, depending on its development and implementation.
You can check the support status by platform at the official website.

There are cases where it has been used as a salesperson application at events of fanzines.
Video and animation
It’s used in apps and games, but it’s also used in videos.
Live2D’s designer team, the
Videos created by “Live2D Creative Studio” can be viewed on YouTube.
He has released many works on Twitter, but I recommend “Beyond Creation” Live2D Original Short Animation, which is available on YouTube, and “Hero Beta”, which was aired in commercials on the ground and in movie theaters. It has a lot of views and high ratings.
I’m curious to see how they make it. No matter which frame you stop, every detail is created, and most of all, it has an amazing expressive power. It’s exciting to think that I might be able to do something I haven’t been able to do before.
VTuber
As an avatar, there are live games and VTubers on YouTube and other video distribution sites, and examples of their use.

The “Niji Sanji” channel is particularly popular.
FaceRig provides the ability to reflect the results of face tracking with the camera into the Live2D model, as well as the ability to switch between facial expressions and output to the screen when creating and distributing videos.
the others
It is also used in the life-size panels of Dospara and the “AI Sakura-san” at JR Tokyo Station. You can see that it is used in a variety of situations.
2. understand the mechanism of Live2D by checking and decomposing the expression method
In the previous section, we have reviewed the application cases. Let’s review and break down the way Live2D is represented here. I’ve structured it so that you can learn all the basics just by reading this article in one sitting.
The essence is the following two points.
・In Live2D, you can record and save (define) the result of the deformation of the illustration.
・Interpolate/blend the deformation results (parameters) and express them as the results of the interpolation.
Easy to see how it works
It seems difficult to understand if you just look at the text here, so I’ll explain it in four simple steps with a simple object.
I’ve prepared a video that summarizes the steps, so you can play it.
We will explain each of the four steps in the video.
1. prepare a destination to save the transformation result (create a key in the parameter)
Select the illustration you want to add movement to.
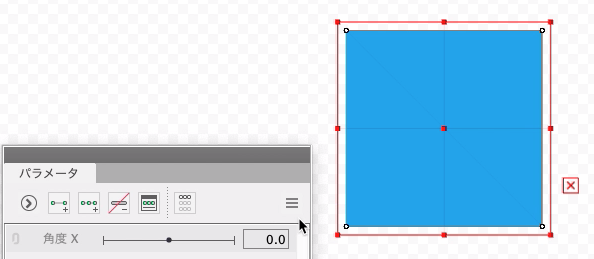
Creates a key (-30, 0, 30) for the parameter “Angle X”.
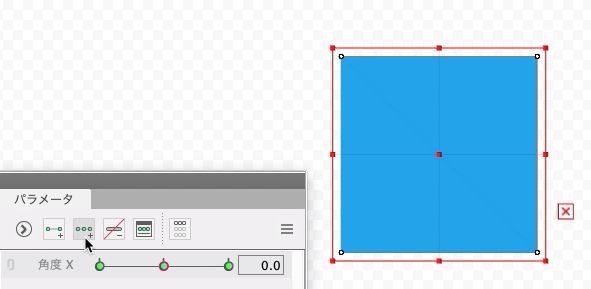
2. Select the destination to save the transformation results (select the parameter value -30)
The red color indicates the key value of the current parameter.
Drag and move to the left near the green and select -30.
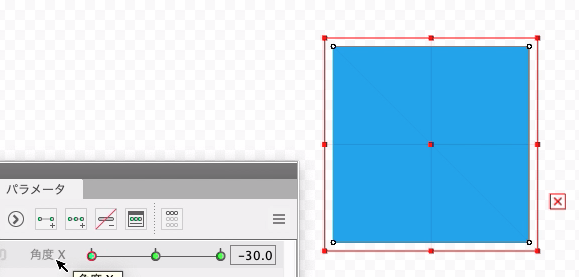
3. record deformations
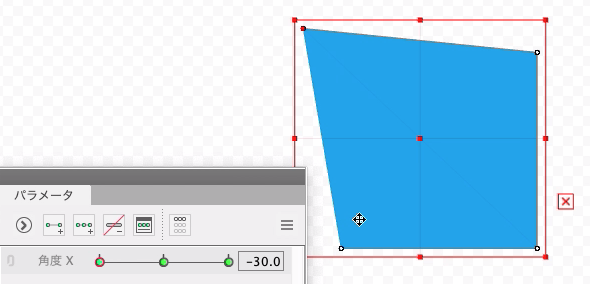
By transforming the illustration on the canvas, you can
Records the transformation to the key of the currently selected parameter.
4. check for deformations
By changing the key of the current parameter, we can see that it is complemented in the middle, as shown below.
In this case, the blended result of the parameter key value “-30” and the parameter key value “0” is represented.
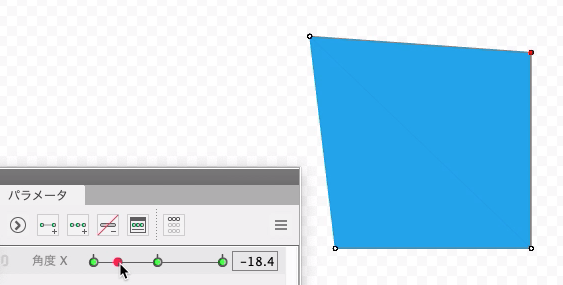
The process of defining parameters in this way is called modeling.
What’s next for modeling?
The model file created by modeling is additionally worked on as follows, corresponding to the application case described in the previous section.
| use | extension | Description |
|---|---|---|
| game app | moc3, motion3.json | moc3 is a built-in model file motion3.json is a motion file corresponding to the model file. Built-in data |
| Video/animation | mp4, gif, sequential number image | image and video export Exporting |
| VTuber | moc3 | Built-in data |
The animation is represented by the interpolation result of successive changes in the values of the parameters.
Layers?
This kind of layered expression, which has been introduced on Twitter and other sites, is a
It means the original illustration needed to prepare the transformation result.
In the editor, you can check it like this.
Please check the official operating instructions “About View Area“.
key point
The following are some of the questions that may have come up so far, and some of the most common hang-ups for beginners.
As for how to create a model, some of the know-how depends on the creator of the model, but it can be solved by checking sample models or books supervised by the official.
The parts that feel complicated and the tricks you need to get used to as you create and learn the model are the parts you need to gain experience and get used to.
Step in and see how it works
Now, we’ll use the mechanism that Live2D provides for deformations that record and save (define) the results of the deformations, but each one is a very simple element.
From here, we’ll go over the simple elements of each.
・Art mesh
・deformer
・parameter
Official Live2D tutorial video
3. understand the production process
I understand how it works, but what kind of production work is involved?
What is the best way to do this, especially if you are making a humanoid?
A simple production flow
The main flow goes like this.
- Confirmation of purpose and type of motion to be created
- Preparing the illustration
- Parameter Design
- Creating a deformer
- Define a range of motion transformation
- Production of motions (if necessary)
Confirmation of restrictions for the intended use of the model
If you want to create a more complex and high quality model, you may want to check the following assumptions before you prepare It’s a good idea to check that these are part of your workflow, even if it’s a sideline job or a side job, as they may be arranged in the content of the request or in the transaction with the client.
・Weight reduction
If you’re using it in an app game or something like that, you need to be aware of the size of the texture, the number of polygons, and the number of parameter combinations to keep the model lightweight.
The number of layers and the fineness of the mesh are directly related to the expressive power, but at the same time it is necessary to consider the balance with the drawing performance.
・Naming conventions
Is the naming of objects, parameter IDs, etc. regular?
For example, if you want to use a type name like “ArtMesh_Name”.
This is the part that may be needed in the design, contacting app developers when creating an embedded model for an app, etc.
・Those that require more advanced knowledge and work
This includes costume changes and hand changes.
What is the unit price and market rate for model production?
As for the price of commissioning or taking orders for production, the Live2D designer team “Live2D Creative Studio” shows specific examples on their model/work creation page.
As of May 5, 2020, the price ranges from 50,000 yen to 300,000 yen, depending on the specifications, as shown below.
As the production team is from a place where Live2D is developed, the quality is high and the price is also high. It would be good to check the market sentiment of individual users on nizima etc.
And finally
In this paper, we have identified three things. When you break down the mechanism, it seems to be easier than you think. Here are a few recommendations for what to do next.
Check the official Web site, download the free version, open the sample model and try to move it, and the understanding will deepen further.
The official tutorial video after launching the editor is also easy to understand, so you can download and try it out first.


